Tuesday, June 22, 2010

What I did on my summer Vacation

What happens when you get about 175 people from all over the country together in Wyoming for a weeklong campout and it pours rain for the first two days, nonstop? Well, if you're at the Dirt Time campout you get about 175 people who say things like "Cool! I can test out my gear!"

Dirt Time 2010 was quickly dubbed "Mud Time 2010", at least until the sun came out on the 3rd day!


We arrived at the site around 11:00 Sunday morning. We checked in at (where else?) the check-in tent and got our official Dirt Time 2010 Goodie Bag donated by Survival Resources (Oh cool, look! A write-in-the-rain notebook! And a whistle!), and picked a place to set up our tent (where we could blow our whistle periodically in the night and use the little notebook to record the comments of fellow campers!)(The didn't give us a pen, though!) The check-in lady said it had been windy and advised us to set up camp among the trees. After looking upward 30' for trees at the height we were accustomed to in Montana, we took it to mean that the 10' Junipers were the referred-to trees. (Inside joke. A little Montana/Wyoming rivalry!)


I sniped at my husband about the huge tent he had insisted on bringing. All that space, for two people? And cots!!! I'd never slept on a cot before while camping! We inherited these along with the rest of my Dad's camping and fishing stuff when he passed away last year. I was in wonder, though, after this big tent with it's huge screened windows was set up, and there were our "beds", up off the ground! Wow! Which way to the parlor?


We went ahead and put up the huge tarp, from behind the tent, up and over, across about an 8' sitting area, and onto the roof of our Jeep Cherokee, where we tied and bungeed the whole thing down. We ran a ridgepole rope from the trees on each side, under the tarp about midway, so it wouldn't sag. What a great breezeway, with our folding chairs spread out and the cooler parked there!


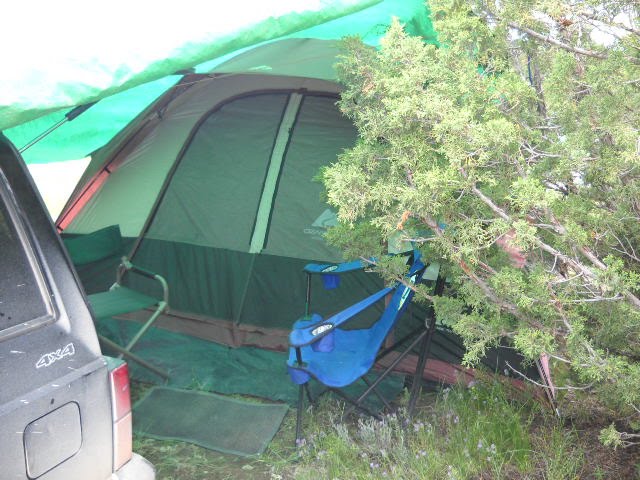
I apologized to Steven and decided to enjoy the luxury...especially when the deluge of rain began two hours later and continued unabated for 2 straight days! Nice, then, to NOT be against the walls of a small tent, to be off the ground, and to have the sitting area to spread out to!

We wandered up through the woods to find the Mess tent and bathrooms. There were actual pine trees up there, the 30' kind, so I ate my humble pie and stopped snickering about Wyoming trees! There were a few dozen people already there, milling around. Among the first we met were John and Denise McCann. They own "Survival Resources", which sells supplies for your BOBs ("Bug out bags"), backpacks, or even to keep in your home or car, as well as teaching survival skills workshops in New York State (http://www.bepreparedtosurvive.com/). Wonderful people. More about them later.

The Mess tents were two 10' by 20' tents, like Costco sells and some people use for carports. The 3-person cooking crew used one for cooking and the other for the serving line. Tarps were strung between trees to privide shelter, and boards were laid across spools from the power copmany to provide "tables". Soup was served for lunch, though officially there was no meal until evening!

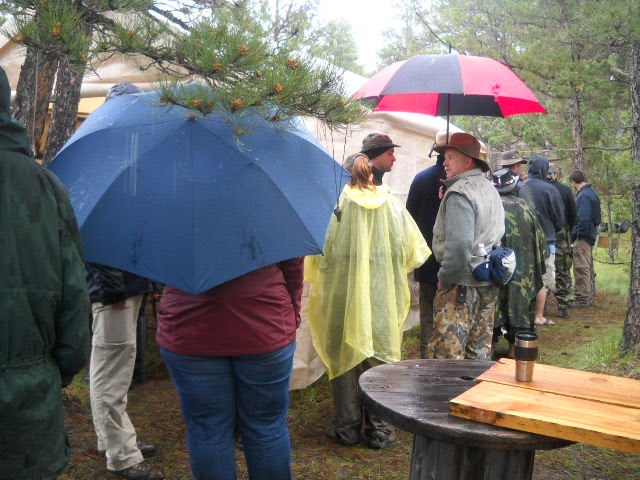
Around 1:00 it started raining. It kept raining. Everything quickly got muddy. The gound did not absorb water. It turned the top several inches into thick gumbo mud. New arrivals were getting stuck in the mud, and volunteers went to pull cars and trucks out of the mud. Finally it got so bad that some rigs were left out in the mud, and their gear was transported the rest of the way in other people's trucks.

We had raincoats but no boots. I tied plastic grocery bags over my shoes and up around my lower legs, to try and keep my feet dry. Some who didn't have raincoats took large garbage bags and made ponchos. I would have cut a hole in the top and stuck my head through, but some of these people were smarter than me! Like John McCann. He said you make a hole along one edge, with the top edge of the hole a few inches from the bottom of the bag, and Ta-Da! You have a hooded poncho! (You'll see a picture of it later on this blog!)

Setting up a tipi

A call went up to help a man from Idaho set up his tipi. Steven was among several who headed out itno the rain and mud to help. I slogged along with my camera, since I'd never seen a tipi being set up. The tipi poles were 27' long. He tied three together about 1/4 of the way down from their tops.
With two of them parallel and the third one across from it, and a rope hanging down from where they were tied together, the men pulled them upright.
They spread the poles so it would balance.
Then the remaining poles were leaned up against the three to complete the circle, a total of 18 poles.
Slick, heavy, wet poles! It rained a steady light rain the whole time.
The tipi cover was attached to another pole and raised into place.
Then the cover was pulled around the poles.
The dinner bell rang (or in this case, the dinner "horn" blew!), so we left the tipi project and went to the Mess tent. Dinner was hamburgers, hot dogs, chips, potato salad, macaroni salad, and pop. Everyone ate standing around under the tarps, then scurried through the pouring rain to their tents. Steven went back to the tipi to help lace up the cover and peg it down.
The tipi belongs to George, who was here with his dog, Gilbert, to teach brain-tanning and snaring. He's a full-time trapper and lives part of the year in a tipi to run his trap line. Here's his tipi the next day:
We we returned to our tent for the night we hung our coats, clothes, shoes, and socks under the tarp-breezeway and in the tent, to dry. We were lulled to sleep by the sound of rain overhead, and woke to the same sound!


Breakfast and mud

MONDAY:

Puddles were everywhere now, and everywhere we went was through foot-high wet grass, which soaked everything up...oh, about a foot high from the ground! Meaning most of us had wet pant legs, socks, and shoes. We could have run around in flip-flops and shorts and not worried about it, but it was 52 degrees. Steven waded up to the Mess tent and had a cup of hot chocolate, then brought a cup of it back to me. I was still warm in my snug (and dry!) sleeping bag! Nothing we hung over night had dried.

The breakfast horn sounded (whatever happened to dinner BELLS?) and I dragged myself out of the sleeping bag, got dressed, and went up to join the chow line.
People gathered under the tarps to eat. Breakfast was pancakes, sausage, oatmeal, milk, and/or juice. I might have missed a thing or two. There was always lots of food.
On display was parfleches and sandals, just two of the many interesting things we had an opportunity to make or learn how to make. These were made by the teacher of the class...um...umm...what what his name again?
One thing is for sure, he does darn good work!


Wilderness First Aid

We went to the Wilderness First Aid class, taught by Brian and Jason. First we learned the common basics: ABC and he had a DE. That's Airway, Breathing, Circulation, which are the first things you need to check for and re-establish if they aren't functioning. "D" was "disability" meaning obvious serious injury to or dismemberment of limbs, and I can't remember what "e" is. There's also "EVPU". Eyes, which means, are they alert enough to see you? Verbal, which means can they talk to you? Pain, which means if you do something like squeeze a little hard on their shoulder (think "spock grip") do they respond with a grimace or other indicator that they feel discomfort/pain? Unresponsive means, well, it's obvious.

Here's Brian torturing, er...I mean demonstrating First Aid techniques on Jason.
His general advice was to plug the holes (the ones that AREN'T supposed to be there), with anything. If it's close enough, it's good enough. You need to stop the bleeding. In their emergency responder kits they keep cool things like Celox, which is a powder you can sprinkle on the bleeding places and it'll clot the blood. Things like that can be ordered from Chinook Medical (http://www.chinookmed.com/), as well as other medical supply sites. He said you can also use instant mashed potato powder/flakes. Potato starch is naturally sterile.

You can sterilize a bandage with water purifier from your pack, such as chlorine or iodine tablets. A bandage cloth (such as a t-shirt) can be laid in the sun for 15 minutes or so to sterilize it, especially if it's a light color. Any drinkable water can be used to wash a wound. You don't need to use anything fancy. A 60 cc. syringe is great to have in your first aid kit for washing wounds. Other things that will help blood to clot are crushed dandelion root and the underside of a Mullein leaf.

Most wounds don't need field stitching. Taping is better since any dirt or bacteria inside the wound can cause infection, and if you stitch it shut, the bad stuff can't get out. If you just HAVE to stitch, there's a handy thing called a skin stapler, also available from Chinook Medical.

He demonstrated several types of tourniquets. Each of us need to research and find which one we like best and what we can afford. You don't apply them to stop bleeding. You only use them for a severed or mostly-severed limb. You place them 1" to 1 1/2" above the injury. Splints can be field-rigged with sticks, etc., but if you want something for your medical kit there's the "Sam Splint" and the cheaper "Dixie Splint".

To diagnose a sprained ankle, squeeze the two leg bones together with your hand just above the ankle. If the person has a surge of pain from that, the ankle is possibly broken. Otherwise it's probably a sprain. You can take the triangular bandage from your first aid kit (what? you don't have one???) and wrap it. Let's see if I can describe what he did...roll it into a long "rope", go under the foot with the middle of it, pull it up each side of the foot, behind the ankle and cross it, back around to the front, pull the ends under the ones that come up from under the foot, and tie it in front of the ankle.

You can go to their website for more information and some videos of the techniques he showed us: http://raems.com/. That stands for "Remote Areas Emergency Medicine and Survival". It's a great site with lots of information. (After I got home I checked it out)

Last but not least, Brian enthralled us with his demonstration of using a catheter to stop a nose bleed. You really just had to be there...


Making bows and gourd bowls

Sig did a class teaching how to make bowls out of gourds. These were huge gourds, like medium-sized pumkins! They cut them in half and pulled, scooped, scraped, and buffed the guts out of them. Then they decorated them. Here you can see the pile of gourds on the ground, and some people picking out their gourds.
A student works on their gourd:
And here's the master of the craft:
Right down the street (well, okay, pretty much next to the gourd people) was the class on bow-making. Here are staves laying on the table, each one crying out in their little stick voices "pick me, pick me!" as students selected their stave and began to work on it:
The staves are clamped down for shaving and sanding.
Ditto


Monday, June 21, 2010

Announcements and sleeping arrangements

Announcements were made from atop this spool...but it looks like the moment that I froze in time in this picture captured a moment when no one was sure what was going on (or who to blame!)
The schedule was posted in the Mess tent. I took a picture so I'd always have a copy of the schedule with me as I walked around:
Here's a creative and colorful camp set-up:
And a mixture of the old and new:


"Killing 101" and "Brain Tanning"

The next class was "Killing 101", taught by George (the tipi guy). He used his dog, Gilbert, as a demonstration tool. (Inserted edit: Sigh...no, people, he didn't actually hit or stomp on the dog, he merely pointed out WHERE to do such things! Quit sending me emails about this! lol)
The first part of his class dealt with killing an animal you've caught in a trap. It's assumed you want the critter for the fur, so you don't want bullet holes or blood on it. When you come across an animal caught in a trap, you need to look for the "damage circle" where the animal has thrashed about, trying to get free. The grass and brush will probably be tore up as far as the animal could reach. Try to stay out of that zone. Use a stick, shovel handle or whatever you can get your hands on, and smack the animal across the nose about midway. That will drop the animal, and then you can stomp on it's rib cage just behind the front shoulder to crush the heart.

Other tidbits he shared with us included that the ears on a bear never grow. If you see a bear with little ears, it's a big bear! When you're shooting an animal for the fur, he recommended aiming for an eye (um...I need more practice). Most animals can be taken with a .22 long-rifle. He said an animal doesn't actually chew it's foot off to get out of a trap. What happens is that as the leg goes numb the animal starts turning and twisting until the leg breaks off.

His recipe for attractant/lure for traps: Rendered fish oil, which is made by putting a whole fish in a jar in the sun and letting it sit until nothing is left except bones. Mix that with 4 drops skunk scent and half a beaver castor.

Next he moved on to talking about brain-tanning hides. You don't have to use the brains from the animal who's hide you're tanning. Any brains from any animal can be used. You can store the brains in the freezer until you're ready to tan with them. He's created a "brain blaster" using a piece of garden hose to flush the brains out of the cranial (skull) cavity. He jabs it in the back where the spinal cord was connected and flushes them out into a waiting container.

When it's time to tan he thaws the brains and puts them in a blender to even out the consistency. He pours them in a kettle and mixes them with water, then brings them to a boil.


When it reaches boiling he shuts off the heat. Meanwhile, he has a fleshed-out hide ready to work. If it's a fox or something skinned whole, the skin/hide is turned inside out. After the brains & water mix is cool enough to put his latex-gloved hand into, he scoops out a handful and swishes it up and down along the skin. Be generous and keep adding brains and spreading it out until you've covered the whole skin.

See, even the women were doing this too!
Rub the brains into the hide and just keep rubbing all over until the whole hide is saturated with them. This doesn't take long. Then you just keep working it with your fingers, stretching and pulling, up and down and all over, for a few hours until the hide is dry. If you need to stop along the way, just put it in a plastic bag and keep in a cool place. It doesn't have to be a refrigerator. It was in the mid-50s and we left them in bags for hours while attending other classes.


George had a trash bag full of fox skins, all fleshed-out and ready to tan. If you wanted to tan one, you picked one out and paid him. They varied in price from $30 to $70. Steven picked out a $50 red fox with darker legs. It's beautiful. I just took pictures for the first part of the procedure, then later helped him for a little while on stretching.


The next step in tanning, after you've stretched and worked the hide with your fingers until it's dry, is to smoke it. (It's hard to roll it in those little papers...oh wait, nevermind!) George uses a small wood-burning tent heater/stove with charcoal briquettes and punk wood (such as very rotted/decomposing trees). You want very little heat and a lot of smoke. He had a 3' stove pipe, and on top of the stove pipe was a leg cut from a pair of canvas (cotton) jeans. You staple the bottom of the hide around the top of the jeans and plug the leg and neck holes with paper towels:
Let the smoke run through the hide until the inside of the hide is light brown (about 45 minutes). Then you're done! If you want, you can wash the hide with Ivory Bar soap (NOT detergent) to remove the smoke smell. The hide will dry nice and soft.


This method can be used for any type of hide. Antelope skins make good shirts. They're thin, soft, and they breathe. George used 5 antelope hides to make this shirt:

Deer and Elk hides make good jackets. He uses buffalo rawhide for moccasin soles. Rabbit (wild ones such as cottontail)), muskrat, and beaver have very thin skins and are hard to tan. Domestic rabbits and jackrabbits are easier. Coyote and fox peel like a rabbit. Split the tail all the way up to make sure the tail bone is all the way out. Turn the hide inside-out and flesh (scrape all membrane and tissue off) the hide. Spread it on a stretcher to dry for a day or more. A stretcher can be made of wood or wire, in a long, oval loop. Pull the hide over like a sock. George said that a dry hide absorbs brains better.

Here's Steven's finished fox at home:

This might be where you need to click on "older posts", below and to the right, to get to the next page. Do that each time you get to the bottom of a page, until you get to the end of Dirt Time.

Lunch!

The lunch horn sounded and Steven put his fox skin in a bag and we went up and got in the chow line. We were never in a hurry to actually get to the food, since the conversations with those around us were always interesting. Today's lunch was chili (sprinkled with shredded cheese), macaroni & cheese, leftover macaroni salad, and leftover hot dog buns tore into squares to pass as "dinner rolls" (Waste not...!), and fruit.
Some of the people making gourd bowls used them for their chili. Here are those who "have":
and those who "have not"! It's funny how the gourd bowl people ended up segregated from the styrofoam people!
And here's more people spread around, eating wherever they found a space to set their stuff!


"Primitive Forge"

After lunch we went to a class called "The Primitive Forge", taught by Jason. You can make a forge if you're out in the wilderness, as long as you can find some metal to work with once you have the forge made. You might ask yourself why you'd want a forge in a wilderness/survival situation, and certainly you shouldn't be looking for things to do that with until you've covered the first essentials, such as shelter, fire, water, food, etc. But if you're there a while and want to make some tools, start scavenging around for metal scraps. You can often find metal in even the most remote places. Who hasn't been so far out in the wilderness that they thought maybe they were the only people to have stepped on that soil, and then found a beer can?

For your forge project, first you want to make some charcoal. Soft wood like pine makes faster charcoal than hard wood. Ideally, you could stuff a 55-gallon barrel with the wood, punch holes in the lid for gases to escape, and light a fire underneath it. After a while smoke will start to come out the holes in the lid. When it quits smoking, your charcoal is done.

Obviously, 55-gallon metal barrels aren't likely to be handy in the wilderness. For our class he used a small campfire burned down to coals. He mixed sand and mud to make clay. Here, Robin is mixing the clay in a bucket while Jason explains the procedure:

Then Jason made a horseshoe-shaped bowl on the ground, about 18" long and 12" across:
Then he improvised a bellows with a trash bag. He said you can use things like clothing, stuff bags, anything that will hold air, even if it's not air tight. He had found a leg bone from a cow in a nearby field, and he used a stick in a hand-drill fashion to get the marrow out, creating a tube. The tube can be made out of anything hollow: bone, reed, pipe, whatever you can find or make.
He took the garbage bag and cut a hole on one bottom corner and attached that over the end of the cow bone tube. He used duct tape, but you could tie it with cord if you didn't happen to find duct tape while scavenging the wilds (or didn't have some in your pack). The other bottom corner was available to be weighted down with a foot or a rock so it wouldn't blow or twist. If you have an extra person available they can be your bellows person, but the whole procedure can be done by only one person:

Next Jason dug a rench through one side of the mud horseshoe and buried the other end of the cow bone so the opening was near the bottom of the fire bowl. The coals from the campfire were scooped into the bowl. He laid a piece of scrap metal, in this case, rebar, in the fire. A volunteer from the class worked the bellows by scooping air with the garbage bag, holding it closed with his hands, and squeezing it to force the air through the cow bone. The air rushed onto the coals and made them super-hot. Heat rises, so you want to keep your metal above the heat, not shoved down into it.
Now you need somehting to hit on, and something to hit with. To hit "on", find a rock, cement, or anything hard and not flammable. To hit with, use a rock, or hammer if you have one. (This is also something a person can do in their backyard where you might have all kinds of things available.)
If you're using a chisel, say, to "cut" a heated piece of metal, such as a lawn mower blade or rebar, dip it in water between blows to keep it cool and hardened. Here Jason is using a chisel to cut a heated piece of metal:
When making something long, like a sword (katana) work only 2" at a time, since that's all you can properly heat at a time. You can hammer a knife blade out of clay first to get a feel for it so you don't waste a lot of steel.
Work at the far edge of your anvil so the hammer won't hit the anvil instead of the metal you're working and cause an uneven surface.
You can use a bellows for cooking. He said water will boil in less than 3 minutes. In the Gobi desert there isn't wood for fires, so they cook over horse manure. They carry a portable bellows so their food cooks faster.
Other tidbits: The Japanese folded steel to work the impurities out of it. They actually were making steel, not forging it. Also, he said some railroad spikes are made of iron and can't be worked on a forge. In fact, if you overwork your steel, pounding on it too much, you'll make it into iron.


"Survival Kits"

After that was John's class on "Survival Kits". He listed 7 basics for a Survival Kit: Fire-starting, Water (purify, store, carry), Shelter, Signal (for help), Navigation, Means to collect food (snare wire, knife), and Medical (even if it's just steri-strips/band-aids). Those are the main categories you work from.

Here John shows one of his compact Survival kits:
And an even MORE compact kit:
Here it is up close:


John's hat had 30' of braided parachute cord for a hat band. Inside that he had fish hooks and line. He also had a magnesium fire starter in his hat. He had a bandana, which can be used as a sling, to filter water, and even to blow your nose on!
He carries an oven bag, folded into a tiny bundle, for a water bag. Before hand, he pours a liter of water into the bag and marks the water line. Then he has a measure to go by. You can use a camera bag, a mint can (such as Altoids), or any type of bag or container for a Survival Kit. Even the very compact kits he demonstrated were packed with an amazing amount of stuff. Metal containers for your kits can be used to cook in, boil water, or melt snow.
He recommended Contractor's trash bags. They can be used as a poncho, a shelter, to carry water, or can be filled with leaves to make a mattress and/or blanket. Here John models the method he uses to cut a trash bag to make a hooded poncho:
A cable saw can be coiled and packed, or even built into the belt aorund your waist. Foil cooking pans can be folded flat and carried in your pocket. (Good reason to wear cargo pants! Those pockets aren't just for decoration!)
You should have lengths of parachute cord. There is a multitude of uses for it, such as tying things (even tying on splints or bandages), using it to hold together a shelter, etc. An important note is to be careful what you buy. Paracord is NOT parachute cord. Real parachute cord has 7 strands. Another type of useful cord is the replacement cord from venetian blinds.
Rubber tubing is handy to have. You can use it to blow on your fire to rev it up, to make a slingshot, or as a straw. Sewing bobbins can be used to wind up fishing line or snare wire. For snare wire he recommended 24-gauge brass wire.
Make a bail handle for all of your pots and cups. Punch a small hole on each side of the top of the pot or cup. Bend a wire into an arch, hook up the last little bit of the wire and put it through the holes. He cuts a small notch in the top of the rim near the holes to keep the wire in place, upright:
An antenna wire can be used to push the pith out of the center of sticks, and it can be stuck on the end of your tubing to make a better straw or blow tube.
For more information John has a wonderful website where you can not only get more information, but also order all sorts of products to make putting your own Survival Kit together a fun project: http://www.bepreparedtosurvive.com/. He is the author of the first book devoted solely to buidling survival kits.


Waiting for dinner

After John's class we had time before dinner, so we went back to George's tipi so Steven could work more on his fox hide. After I used up all my excuses (taking pictures, asking questions!) I helped Steven stretch the hide. It wasn't really icky, just kind of clammy and rubbery-feeling. As we worked it and it got drier it felt almost like worn-out velvet.

I took pictures inside the tipi but it was hard to get back far enough. Here, George is looking at someone's fox skin. The fire is in the middle of the tipi. If I remember right, this tipi has about a 20' diameter at the ground.

This is looking up toward the opening at the top.


Dinner was chicken breasts cooked with brocoli and zucchini in broth, sliced potatoes in gravy, lettuce salad, and rolls. Dessert was bread pudding with banana slices in it. Here's the chow line as everyone waited in the rain to go through the serving tent:


Rainwater ran off the edges of the tarps strung about to provide shelter in the eating area, and we clustered under them in whatever somewhat-dry places we could find. As we walked back to our tent we passed this setup of a hammock covered by a tarp. There were a few other people sleeping this way, too:


When we got to the tent we sat in our breezeway area and Steven worked on his fox hide, which was hard to do since he was laying on his side...oh wait, the picture is sideways! I hate fixing stuff like that after I upload it.
I read a book I'd brought along, when I wasn't taking pictures or annoying Steven!

The rain stopped around the time it got dark and the sky started to clear out.